
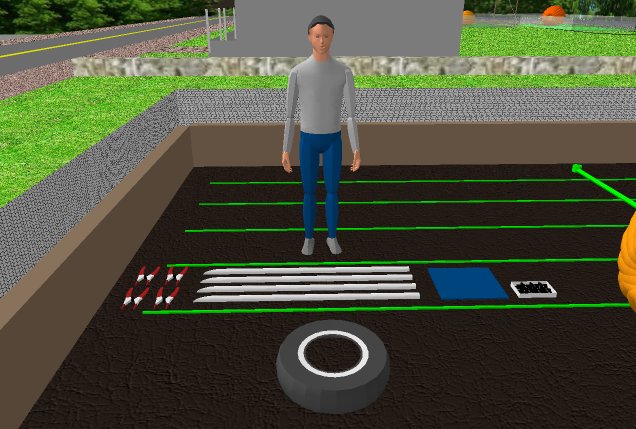
Materials Required:
2 - 10' pcs. 1 1/2" plastic conduit
2 - 10' pcs. 1/2" metal conduit
12' x 16' of Plastic Tarp
2 Tie-wraps or Zip-ties
4 - 2" Hand Clamps
1 Box of Large Binder Clips
1 - Old 13" Tire or a Metal Conduit Bender
Step One:
 Cut each of the pieces of 1 1/2" conduit in half, at an angle so as to form 4 peices with a point on the end.
Lay your material out so it's easy to get to yet out of the way. We all know how much damage to our plant
can be caused by tripping over things in the patch.
Cut each of the pieces of 1 1/2" conduit in half, at an angle so as to form 4 peices with a point on the end.
Lay your material out so it's easy to get to yet out of the way. We all know how much damage to our plant
can be caused by tripping over things in the patch.
Step Two:
 Measure out a 5 foot x 5 foot square where you want the corners of your shade structure to go.
Drive one piece of 1 1/2" plastic conduit about a foot into the ground at about a 5 degree angle, with the top pointing
away from the center.
Measure out a 5 foot x 5 foot square where you want the corners of your shade structure to go.
Drive one piece of 1 1/2" plastic conduit about a foot into the ground at about a 5 degree angle, with the top pointing
away from the center.
Step Three:
 Drive the remaining 3 pieces of 1 1/2" conduit into the ground, maintaining about a 5 degree angle away from the center of
the structure.
Drive the remaining 3 pieces of 1 1/2" conduit into the ground, maintaining about a 5 degree angle away from the center of
the structure.
Step Four:
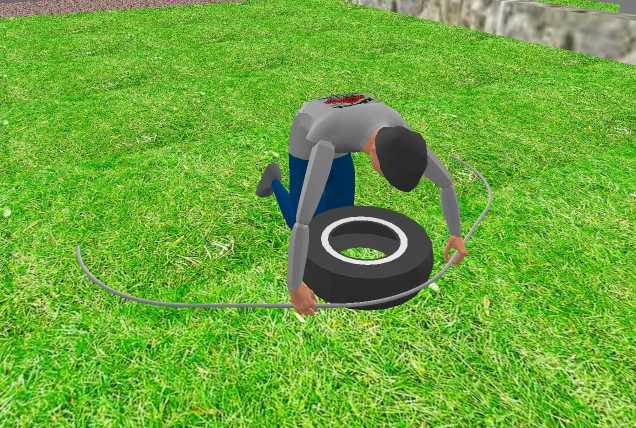 Lay the old tire on the ground outside of the patch. Mark the center of each piece of the 1/2" metal conduit.
Carefully bend a 30 degree radius into the center of each length of 1/2" conduit, using the tire as a mold. Bend slowly so
as to not kink the the tubing. Next, bend the ends of each length of tubing. Make sure there is at least 6" of straight tube
at the end and that the end points straight down. This step requires some checking against the distance between opposite corners
of your structure (Steps 2 & 3) to insure that the bent 1/2" conduit will fit into the 1 1/2" conduit you drove into the ground.
Lay the old tire on the ground outside of the patch. Mark the center of each piece of the 1/2" metal conduit.
Carefully bend a 30 degree radius into the center of each length of 1/2" conduit, using the tire as a mold. Bend slowly so
as to not kink the the tubing. Next, bend the ends of each length of tubing. Make sure there is at least 6" of straight tube
at the end and that the end points straight down. This step requires some checking against the distance between opposite corners
of your structure (Steps 2 & 3) to insure that the bent 1/2" conduit will fit into the 1 1/2" conduit you drove into the ground.
 When the 2 pieces of 1/2" conduit are bent properly, they will cause the 1 1/2" conduit posts to bend slightly toward the middle, essentially
locking them in place through friction and making the structure rigid. Also, making sure there is sufficient length of 1/2" tubing inside the
1 1/2" corner posts will insure the ribs do not pop out under wind load. A metal conduit bending tool makes this step a little easier.
When the 2 pieces of 1/2" conduit are bent properly, they will cause the 1 1/2" conduit posts to bend slightly toward the middle, essentially
locking them in place through friction and making the structure rigid. Also, making sure there is sufficient length of 1/2" tubing inside the
1 1/2" corner posts will insure the ribs do not pop out under wind load. A metal conduit bending tool makes this step a little easier.
Step Five:
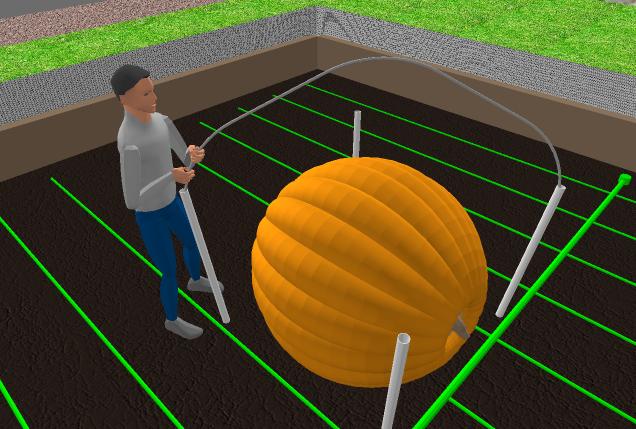
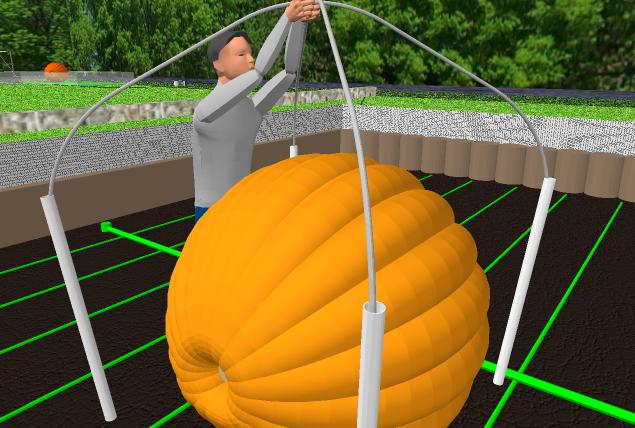 Place both support ribs into the corner posts as shown above, one over the top of the other at the peak. Press each end of the 1/2" conduit firmly
into the 1 1/2" posts. Cinch the 2 ribs together at the peak using 2 tie-wraps.
Place both support ribs into the corner posts as shown above, one over the top of the other at the peak. Press each end of the 1/2" conduit firmly
into the 1 1/2" posts. Cinch the 2 ribs together at the peak using 2 tie-wraps.
Step Six:
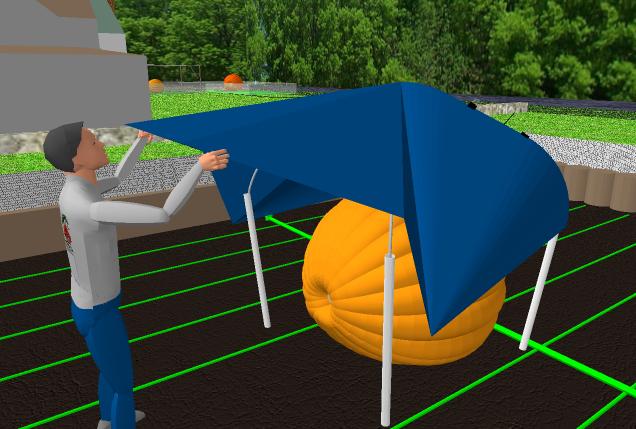 Spread the tarp out evenly over the structure, centering it at the peak. Starting on 1 side, carefully fold the tarp so that it fits snuggly
to the structure. Attach the tarp to the 1/2" conduit with large binder clips, then move to the next side, forming, folding and clipping the tarp as you go. You will want more tarp extending down on the south side than you will the north so adjust as you go accordingly.
Spread the tarp out evenly over the structure, centering it at the peak. Starting on 1 side, carefully fold the tarp so that it fits snuggly
to the structure. Attach the tarp to the 1/2" conduit with large binder clips, then move to the next side, forming, folding and clipping the tarp as you go. You will want more tarp extending down on the south side than you will the north so adjust as you go accordingly.
Step Seven:
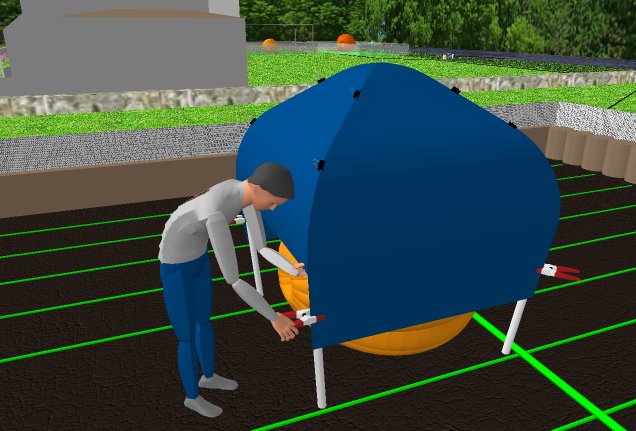 Finally, pull the extra length down at each corner, folding the tarp against the post and secure with a large hand clamp.
Congratulations, you have just built a simple, inexpensive shade structure that will withstand wind and weather while keeping your fruit safe,
dry and in the shade. When you want to access your fruit, simply pull off a few clips and open up the tarp When your done, fold the tarp
back up along the creases of the folds and replace the clips.
|
|
| |
|